Where Do U Place the Sat Com in Zombies in Spaceland
On PC, PS4 & Xbox One: Uncover every secret step of the 'Zombies in Spaceland' Easter egg quest with Gameranx's expansive guide.
Make first contact and defeat the final alien boss on the Zombies in Spaceland map with Gameranx's Easter egg tutorial, taking you step-by-step through each out-of-this-world challenge.
Ever since the final Black Ops 1 DLC, every Zombies map features a cryptic and crazy-difficult Easter egg quest. The quest usually involves finding hidden things on the map, completing bizarre objectives, and defeating a unique boss at the end. Spaceland is no different, although the map in general is more user-friendly that previous incarnations of Zombies. There's just a little less random generation here, though that's still an element — instead, you'll need DJ Hasselhoff. Yes, that Hasselhoff.
This Easter egg can be completed solo, local or online. Infact, solo is the EASIEST path to victory for this Easter egg. Yeah — sounds insane, but you'll see why that is soon.
The Complete Easter Egg Guide
[STATUS : CONFIRMED COMPLETE.]
You can attempt the Easter egg even if you're not familiar with Zombies in Spaceland, the first Zombies survival map in Infinite Warfare. Your chances of survival solo are low, so it helps to bring online friends that you can coordinate with to fully complete this super challenging quest.
Note: If you're new to Zombies in Spaceland, check out the map kiosk in the Spawn Room. It will show you around the map and explain some of the systems.
Ready to go? Good. We'll cover each step of the Easter egg in as much detail as possible.
Step #1: Turn on the Power & Unlock the Pack-a-Punch Room
Turning on the power is the first step of every Zombies map, and turning on the power will also help you gain access to the Pack-a-Punch Room — along with turning on all the arcade games and perk vending machines you'll need.
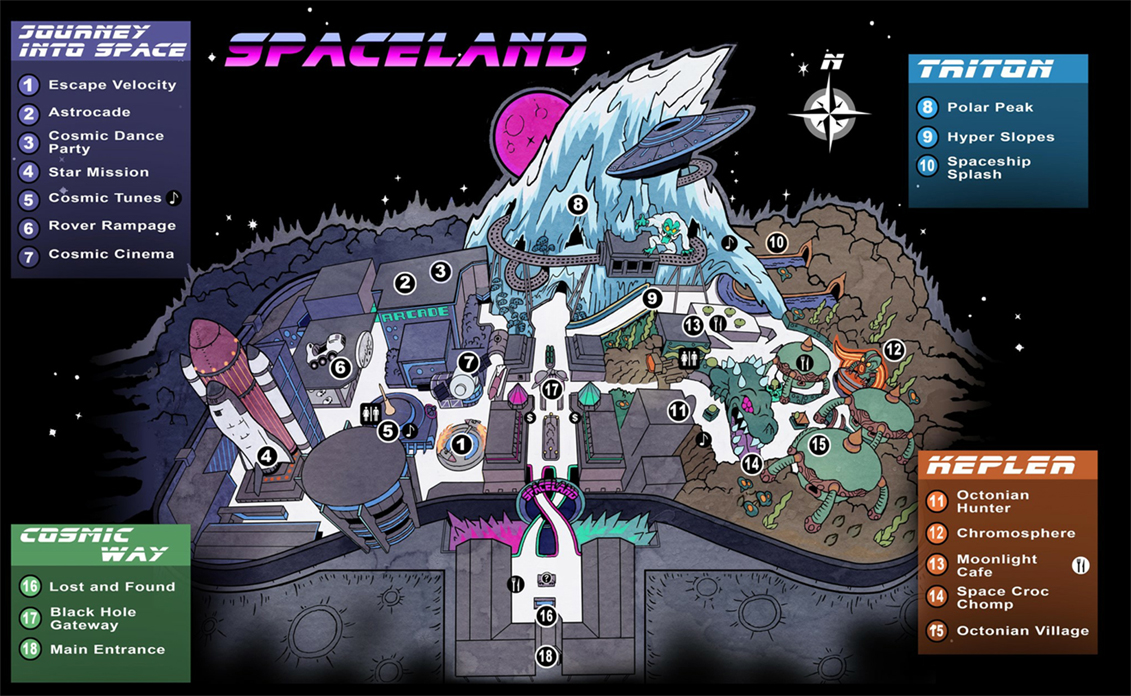
To turn on the power, you'll need to find four power generator switches in all four sections of the map.
There is a fifth power switch in the Spawn Room — flip it to leave the spawn and reach Cosmic Way, the Hub that connects to the other four areas.
- Power Switch Locations:
- Galaxy Journey: Go through the left door of the 'Star Mission' attraction with the giant rocket ship trap at the back of the Galaxy Journey area. The switch is on the left wall, before entering the bumper car area.
- Astrocade: From the Cosmic Way entrance, find the deactivated portal gateway on the right wall. Continue forward and turn right just past the gateway to find an alcove near a Zombie spawn window. The switch for this area is found here.
- Polar Peak: In the Triton-themed section of the park, enter the roller coaster lobby and take the stairs up. The curved ramp staircase leads to another buy-wall ($1250) — unlock the path and look to the left wall right past the perk machine to find your switch.
- Kepler System: From the entrance, unlock the left path and go up the stairs to the Moonlight Cafe. The last power switch is connected to the left exterior wall of the cafe, right next to the steps.
Near each of the four Power Switches, you'll find an inactive Portal. Once the power is on, each portal will start glowing with swirling energy. To activate a portal and teleport back to Cosmic Way, use the control box next to the portal itself and wait a few seconds until an image appears in the portal. Now you can step through.
- To Unlock the Pack-A-Punch Room — You must enter all four portals, located near the four Power Switches described above, until all four lights above the Cosmic Way portal light up. Once they're lit, an image will appear in the portal. Enter it to reach the Pack-a-Punch room.
Now you can use the Pack-a-Punch to gain stronger weapons for $5000 points. Stronger weapons are important, but the Pack-a-Punch Projector Room is filled with secrets.
NOTE: Make sure you go inside the Projector Room at least once. You don't need to use the Pack-a-Punch machine, but you do need to go inside.
Step #2: Get the SETI-COM and Give to DJ Hasselhoff
Next, you'll need to collect the pieces for the SETI-COM. There are three parts you'll need to find, and each of the three parts randomly spawns in one of three locations. Check all the locations listed below to get the parts you need to continue this Easter egg.
"use strict";
var masterslider_de0d = new MasterSlider();
// slider controls
masterslider_de0d.control('arrows' ,{ autohide:true, overVideo:true });
masterslider_de0d.control('thumblist' ,{ autohide:false, overVideo:true, dir:'h', speed:17, inset:false, arrows:false, hover:false, customClass:", align:'bottom',type:'thumbs', margin:2, width:140, height:80, space:2, fillMode:'fill' });
// slider setup
masterslider_de0d.setup("MS61cd4253bde0d", {
width : 960,
height : 540,
minHeight : 0,
space : 0,
start : 1,
grabCursor : true,
swipe : true,
mouse : true,
keyboard : false,
layout : "fillwidth",
wheel : false,
autoplay : true,
instantStartLayers:false,
mobileBGVideo:false,
loop : false,
shuffle : false,
preload : 3,
heightLimit : false,
autoHeight : false,
smoothHeight : true,
endPause : false,
overPause : false,
fillMode : "fill",
centerControls : true,
startOnAppear : false,
layersMode : "center",
autofillTarget : "",
hideLayers : false,
fullscreenMargin: 0,
speed : 17,
dir : "h",
responsive : true,
tabletWidth : 768,
tabletHeight : null,
phoneWidth : 480,
phoneHeight : null,
sizingReference : window,
parallaxMode : 'swipe',
view : "basic"
});
window.masterslider_instances = window.masterslider_instances || [];
window.masterslider_instances.push( masterslider_de0d );
});
- Part #1: Calculator
- Location #1: On the yellow bench on the right side of the center of Cosmic Way, right before reaching the Pack-a-Punch portal.
- Location #2: On a yellow lunch table in the eating area opposite from the Chromosphere trap in the Kepler System.
- Location #3: Inside a blue trashcan on the right-side of the upper floor, inside the Astrocade area.
- Part #2: Boombox
- Location #1: Lower bridge outside spawn, behind the yellow "Proto-Popcorn" cart.
- Location #2: Found in the underground tunnel's break room, on the kitchen counter next to the coffee machine. The room is on the path to the Kepler System.
- Location #3: On the Moonlight Cafe counter in the Kepler System.
- Part #3: Umbrella
- Location #1: On the red bench near the slide, to the right of the bridge that leads to Polar Peak.
- Location #2: In the Polar Peak gift shop, on the cash register counter near the ramp that leads up to the power switch.
- Location #3: In Journey into Space, look in the dark corner next to the Star Mission rocket ship trap control panel.
The SETI-COM is the most important item for completing the main Easter egg. You're going to need it, and you're going to have to trade it with David Hasselhoff multiple times before the Easter egg is complete.

- To start the Easter egg: Give DJ Hasselhoff the SETI-COM parts. Find him in the DJ booth — there are multiple DJ Booths, so check them all. One can be found in Journey into Space, down an alley behind the cinema. He can also be found near the entrance to the Kepler System, or near Bang-Bang in Polar Peak.
If you've switched on power and unlocked the Projector Room (Pack-a-Punch), the main Easter egg will begin next scene.
Step #3: Defend the SETI-COM Sites
Before getting the SETI-COM from the Hoff, look to the skies. The UFO above Polar Peak will flash colors — that's your signal that it's time to start planting the SETI-COM.
Collect the completed SETI-COM from DJ Hasselhoff. For the remainder of this step, you'll need to find 3 random locations where your screen shakes. These locations appear one-at-a-time, so check the following spots to see where you get screen vibrations.
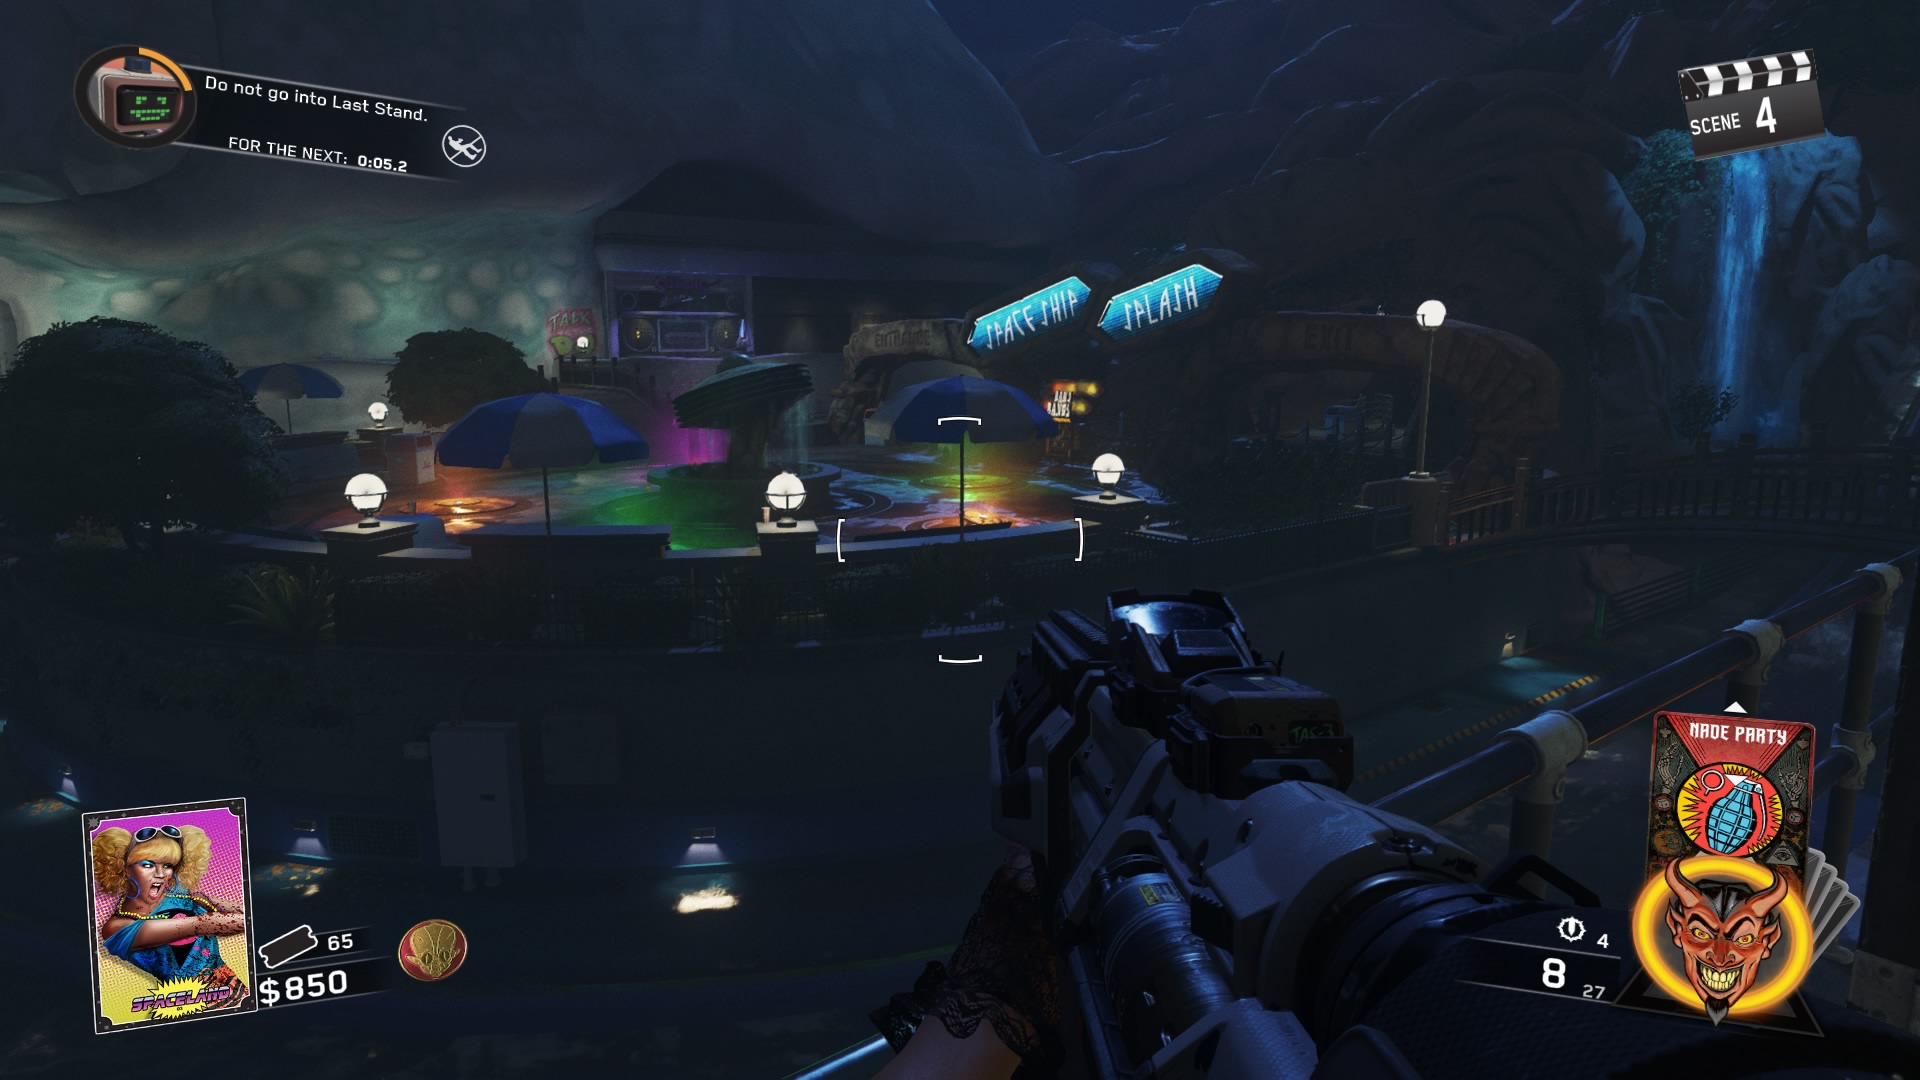
- Fountain Near the Croc Trap
- Journey Into Space Trap near the Entrance
- Splash Fountain With Colored Lighs
- Journey Into Space Rover Rampage Bumber Car Area
- Underground Tunnels Break Room / Kitchen
- Polar Peak Entrance, Near Cosmic Way Bridge
- Polar Peak Gift Shop
[ Note: There are a total of 7 locations. Check them all, you only need to place the SETI-COM 3 times.]
So, what do you do with these screen-shaking locations? Place the SETI-COM.
- SETI-COM Defense:
- After finding a location where the screen vibrates (one of the spots described in the list above), place the SETI-COM and prepare to fight.
- Zombies will spawn and attack the SETI-COM. Fend them off and don't let them destroy the SETI-COM.
- Once the 60 second timer is complete, a nuke will go off. Re-collect the SETI-COM and wait for the next scene to start to find the next SETI-COM location.
- Find 3 screen vibration areas and complete 3 SETI-COM defenses to complete this step.
Once you've placed (and defended) the SETI-COM 3 times, it's time to take it back to DJ Hasselhoff. Interact to give it to him, and wait until after 1 or 2 scenes have passed to continue the Easter egg.
Step #4: Simon Says — Follow the Lights
After two turn have passed, return to DJ Hasselhoff and you'll gain a bunch of speaker items. What do you do with these? Place them in the gold spots around the Projector Room portal (Pack-a-Punch), and one on the steps — all in Cosmic Way.
Before the step can begin proper, you'll need to activate all four in a specific order — from the lowest note to the highest note. Once you correctly activate the tones in that order, the speakers will glow four different colors. That's your cue that the real challenge is about to begin.
- What to do with the items on the floor symbol in the Projector Room:
- Interact with the speakers in order from lowest note to highest note.
- Listen carefully for the notes and interact in that order once all four speakers are placed.
This is when things get crazy. A UFO will appear in the sky above and begin to flash colors — red, blue, yellow, and green. Write down the series of lights and repeat it using the matching colored speakers. The code sequence is always four lights long.
- Repeat the colors that appear on the UFO. After each sequence, the UFO's lights will blink.
- Press the tones fast! You'll have to get it done within 15-20 seconds or the code won't be accepted.
- If you're playing with others, all the current players will have to interact and confirm the final light.
- Failing at 'Simon Says' will cause a Brute to spawn and the light sequence to restart.
Complete 3 sets of "Simon Says" to finish the game. This is when things get really tough — first, you'll have to deal with a huge exploding clown wave.
Step #5: Defeat the Alien Boss
The Alien Boss is a tough nut to crack — it has a huge health bar, and summons extra zombies. One Alien Boss will spawn in per player; that's why it is much easier to complete solo.
The Alien will teleport around the map to follow you while shooting its alien blaster. Sometimes, the boss will appear on a roof, or he'll zip right next to you and push you into a corner. Very, very annoying.
The Easiest Way to Defeat the Alien Boss: Run in a circuit from the Cosmic Way portal to the Spawn area. Dash over the upper bridge, then back through the lower bridge, and finally around the Pack-a-Punch teleporter. Keep moving and he won't have a chance to push you, and the zombies will form a trail behind. Shoot him whenever you can, keep moving, and always land your shots — don't waste ammo!
- Extra Alien Boss Notes:
- Killing the zombie adds will force the boss to pause as it summons more. This is the only way to slow him down, so split time between the zombies and the boss.
- The indicator on the boss goes from green, to yellow, to red so you'll know how much health it has left.
How to Kill the Alien Boss: After damaging the boss, his health indicator will lower to red. Once he's on the ground and completely down, melee his back to steal one of the Alien Fuses.
- You'll only have a few seconsd to melee his back and get a fuse. Be quick and only down the boss when it's on the ground with you.
- To defeat the boss, you'll need to melee 2 fuses off the boss' back. Each time a fuse is knocked off, the boss' health will regenerate. Do it all over again.
Once the Alien Boss is defeated, it drops fuses on the ground. You'll also get an auto-Nuke, Max Ammo, and 1,000
Grab the Alien Fuse from the Pack-a-Punch elevator — this fuse allows you to upgrade the Pack-a-Punch machine and get double upgrades for every weapon.
Step #6: Shoot Down the UFO
Now the UFO follows the player and drops balls of electricity. Time to get rid of this annoyance. From Cosmic Way, look at the back of the large circular Spaceland sign above the pair of bridges linked Spawn to the Hub.
There are five blue glowing lights in the back of this sign. To destroy the UFO, shoot each o the five glowing spots with any Wonder Weapon — there are four Wonder Weapons, and they're pretty tricky to unlock.
- Learn how to create Wonder Weapons here:
- Infinite Warfare: Zombies in Spaceland – All Wonder Weapons Guide
Whe all five blue lights are shot and turn yellow, a discharge will fly into the sky and smash old Black Ops soldiers and gear to choosen from.
- NOTE: Don't shoot the last colored light until the UFO is flying directly above the Pack-a-Punch portal. Why?
Once you change the fifth light of the sequence, a killer beam will appear and destroy anything directly above the portal.
- The Soul Key: After blowing up the UFO, the Soul Key will appear right in front of the Pack-a-Punch portal. Collect it to complete this Easter egg and earn your hard-earned achievement / trophy.
There's still more to do, even after finishing the Easter egg. To finish up your sticker collection, you'll have to construct the X-Quisite Core. Expect to find that and many more Infinite Warfare: Zombies guides on Gameranx.
Check out even more Infinite Warfare & Zombies in Spaceland guides on Gameranx:
- Infinite Warfare: Zombies in Spaceland – How to Unlock the Pack-a-Punch
- Infinite Warfare: Zombies in Spaceland – How to Summon David Hasselhoff
- Infinite Warfare: Zombies in Spaceland – Here's How to Turn on the Power
- Infinite Warfare: Zombies in Spaceland – Elemental Effects Upgrade Guide
- Infinite Warfare: Zombies in Spaceland – All Wonder Weapons Guide
- Infinite Warfare: Zombies in Spaceland – Survive on Solo With This Trick
- Infinite Warfare: Zombies in Spaceland – Souvenir Prize List | Coin Combos
- Infinite Warfare: Zombies in Spaceland – How to Unlock Playable Hasselhoff
- Infinite Warfare: Zombies in Spaceland – How to Get Double Pack-A-Punch
- Infinite Warfare: Zombies in Spaceland – How to Get the X-quisite Core
- CoD: Infinite Warfare – All Weapon Scan Locations | 'Gun Nut' Guide
- CoD: Infinite Warfare – How to Unlock the Permadeath YOLO Difficulty
- CoD: Infinite Warfare – 100% Achievement / Trophies Guide
- CoD: Infinite Warfare – All Equipment Locations | 'Fully Equipped' Guide
- CoD: Infinite Warfare – PC Fixes Guide | Black Screen, Low FPS, Crashes
- CoD: Infinite Warfare – Most-Wanted Target Locations | 'Royal Flush' Guide
Where Do U Place the Sat Com in Zombies in Spaceland
Source: https://gameranx.com/features/id/80563/article/infinite-warfare-zombies-in-spaceland-the-complete-easter-egg-guide/
0 Response to "Where Do U Place the Sat Com in Zombies in Spaceland"
Post a Comment